
GreenScreen in iMovie
Change the background of a clip in iMovie
In iMovie on iPhone, iPad, or Mac, use the green-screen effect to change the background of your video.
With the green-screen effect in iMovie, you can superimpose a video clip over a background video clip, photo, or other image. First, record your subject in front of a green or blue screen. Next, add that clip above the background clip in the iMovie timeline. Then, use the green-screen effect in iMovie so the background clip is visible behind your subject.
Record video in front of a green or blue screen
Use the green-screen effect in iMovie on iPhone or iPad
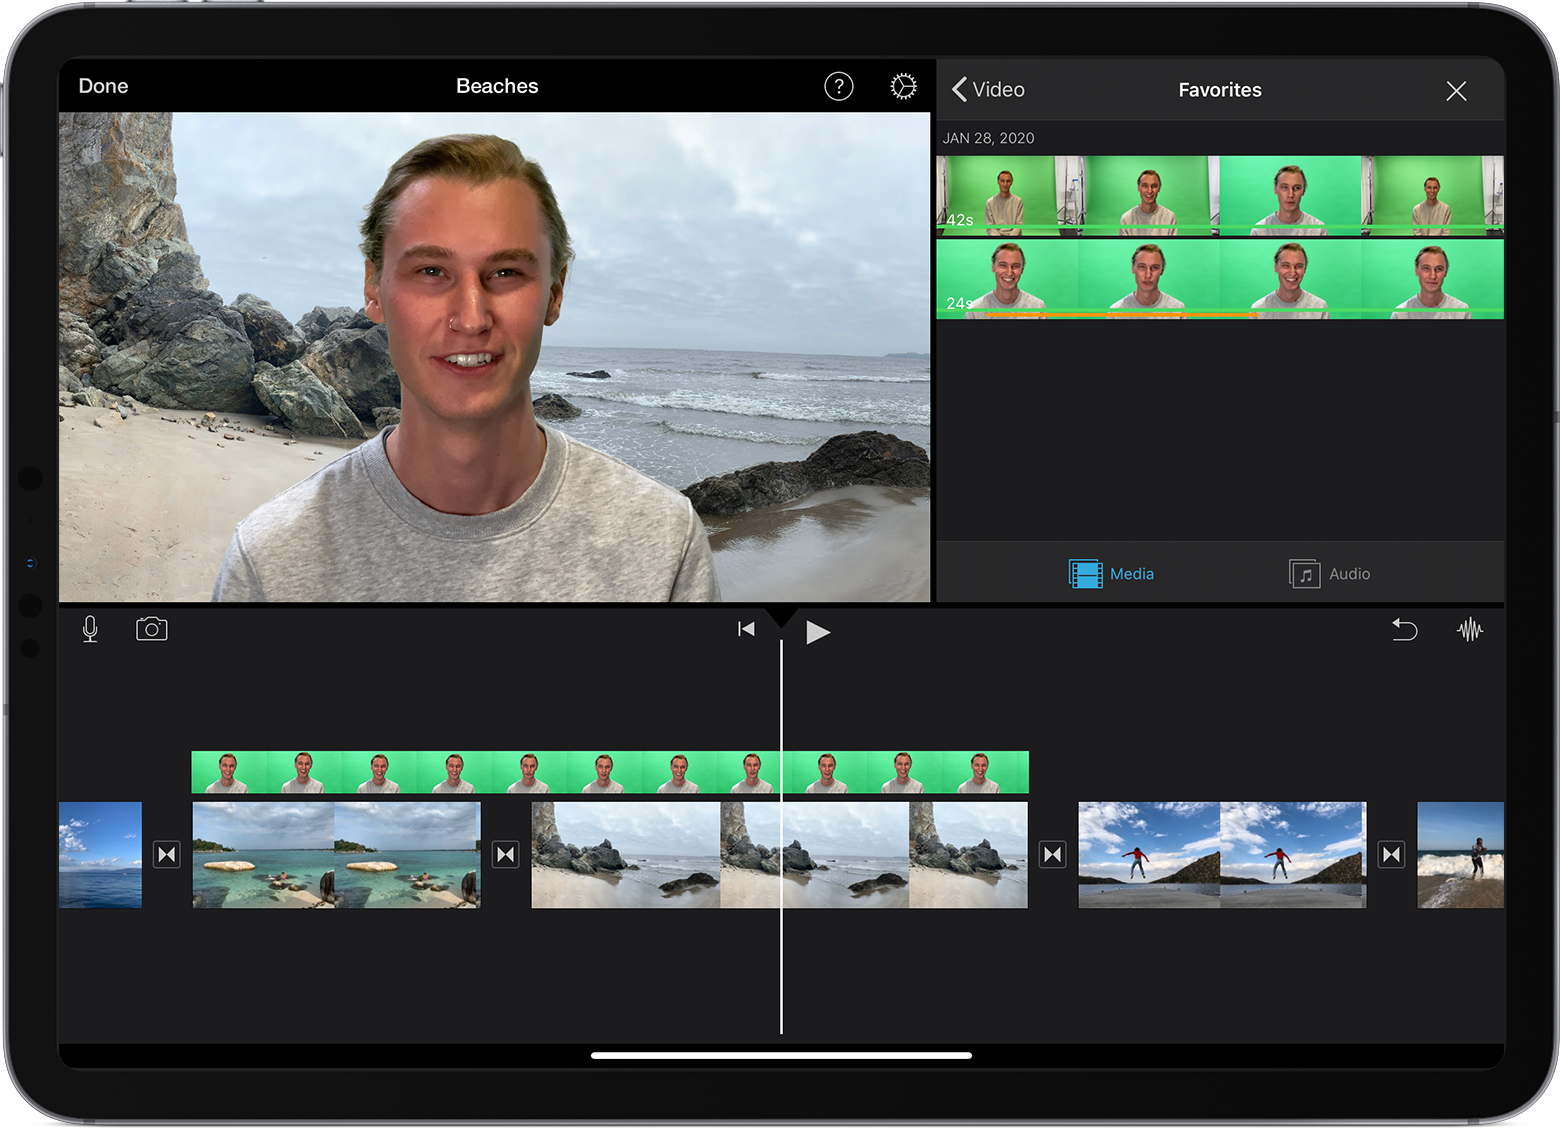
- With your project open, add the background video clip or still image to the timeline.
- Scroll the timeline so that the playhead (the white vertical line) appears over the background clip.
- Tap the Add Media button , tap a category from the list, then tap the green-screen clip to select it.
- In the viewer, tap Auto to automatically remove the green or blue from the clip. Or tap the color in the clip in the viewer to remove that color.
- Tap the More button , then tap Green/Blue Screen. The green-screen clip is added to the timeline above the background clip.
- Trim and move the background video clip to match the length of your green-screen clip. Because the clips are connected, the two clips move together when you rearrange clips in the timeline.
Adjust the green-screen effect on iPhone or iPad
After you’ve added the green-screen effect, you can make adjustments. Tap the green-screen clip you want to adjust in the timeline, then use any of the green-screen controls to make adjustments:- To change the amount of green or blue removed from a green-screen clip, tap the Adjust button, then drag the Strength slider left or right.
- To crop parts of a green-screen clip, tap the Mask button, then drag the corners.
- To change the amount of green or blue removed from a green-screen clip, tap the Adjust button, then drag the Strength slider left or right.
- To crop parts of a green-screen clip, tap the Mask button, then drag the corners.
Use the green-screen effect in iMovie on Mac
- With your project open, add the background video clip or still image to the timeline.
- Add the green-screen clip above the background clip in the timeline.
- Trim and move the background video clip to match the length of your green-screen clip. Because the clips are connected, the two clips move together when you rearrange clips in the timeline.
- If the video overlay controls aren’t shown, click the Video Overlay Settings button
 above the viewer, then choose Green/Blue Screen from the pop-up menu.
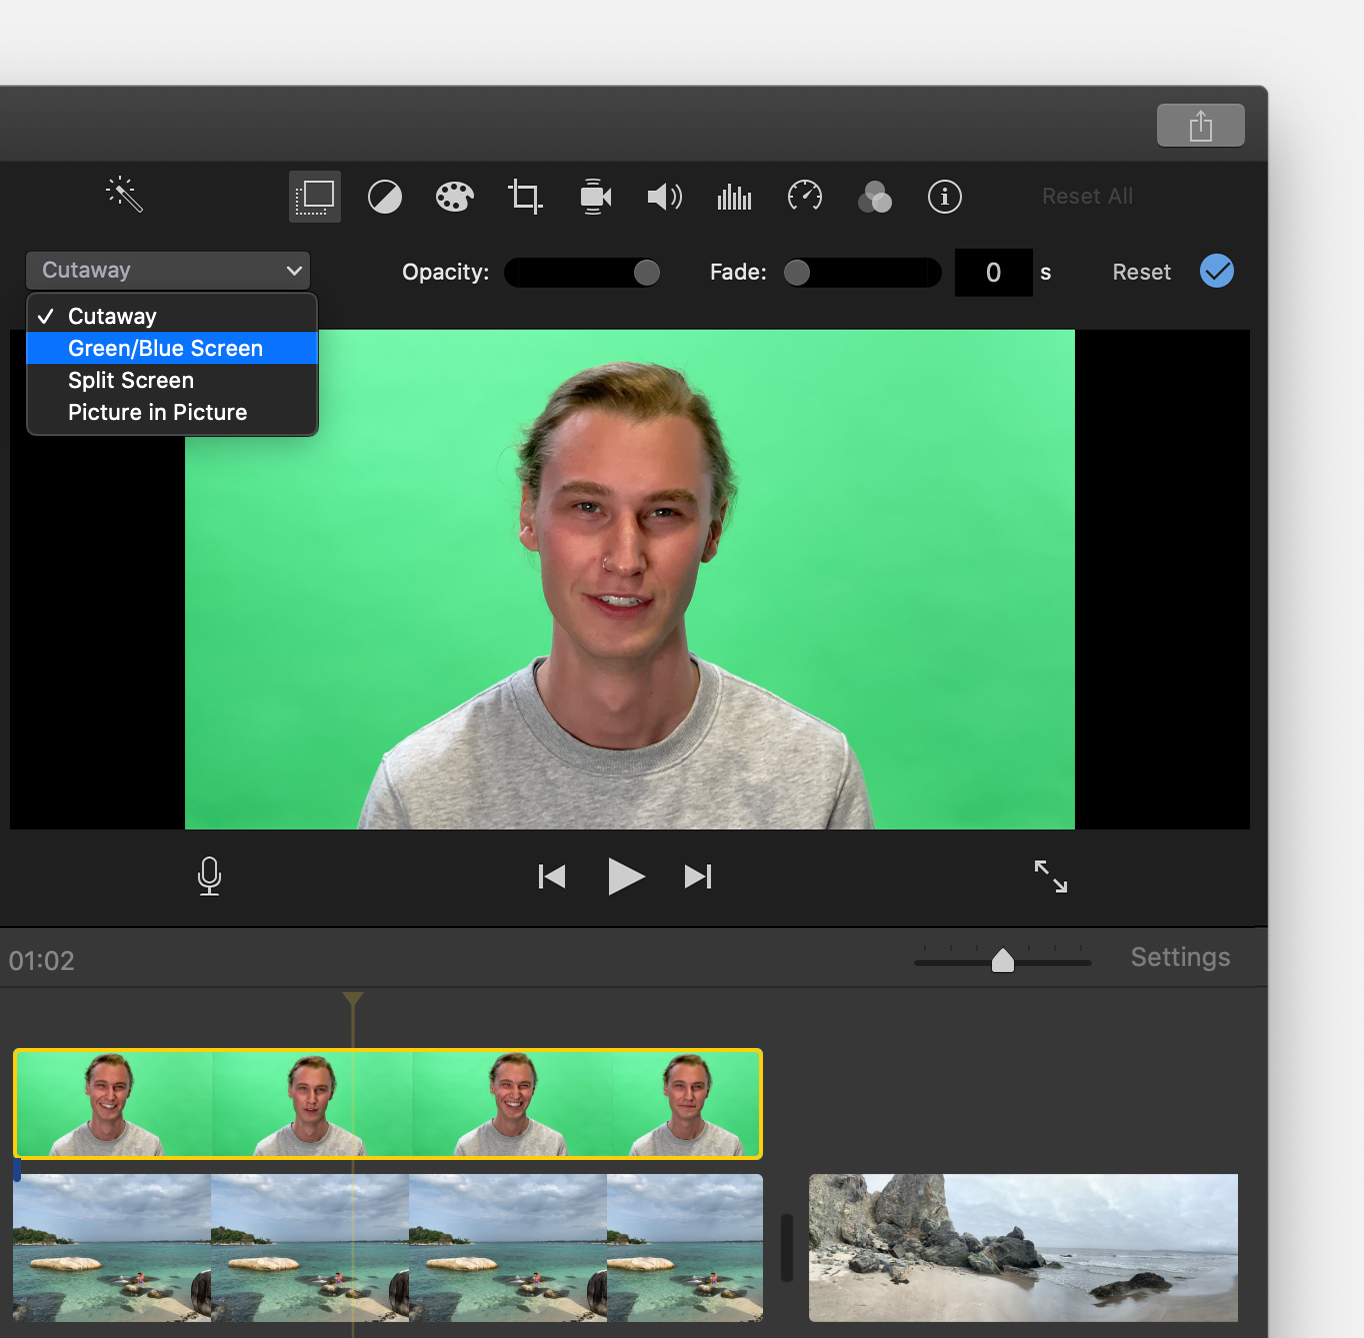
In the viewer, iMovie removes the green or blue from the green-screen clip to reveal the background clip behind your subject. Because the clips are connected, the two clips move together if you rearrange clips in the timeline.
The color that iMovie removes is based on the dominant color in the frame at the position of the playhead when you choose Green/Blue Screen from the pop-up menu. If the frame below the playhead isn’t representative of the rest of the clip, reposition the playhead and reapply the effect.
- With your project open, add the background video clip or still image to the timeline.
- Add the green-screen clip above the background clip in the timeline.
- Trim and move the background video clip to match the length of your green-screen clip. Because the clips are connected, the two clips move together when you rearrange clips in the timeline.
- If the video overlay controls aren’t shown, click the Video Overlay Settings button above the viewer, then choose Green/Blue Screen from the pop-up menu.
In the viewer, iMovie removes the green or blue from the green-screen clip to reveal the background clip behind your subject. Because the clips are connected, the two clips move together if you rearrange clips in the timeline.
The color that iMovie removes is based on the dominant color in the frame at the position of the playhead when you choose Green/Blue Screen from the pop-up menu. If the frame below the playhead isn’t representative of the rest of the clip, reposition the playhead and reapply the effect.
Adjust the green screen effect on Mac
After you’ve added the green-screen affect, you can make adjustments. Select the green-screen clip in the timeline, click the Video Overlay Settings button , then use any of the green-screen controls to make adjustments.
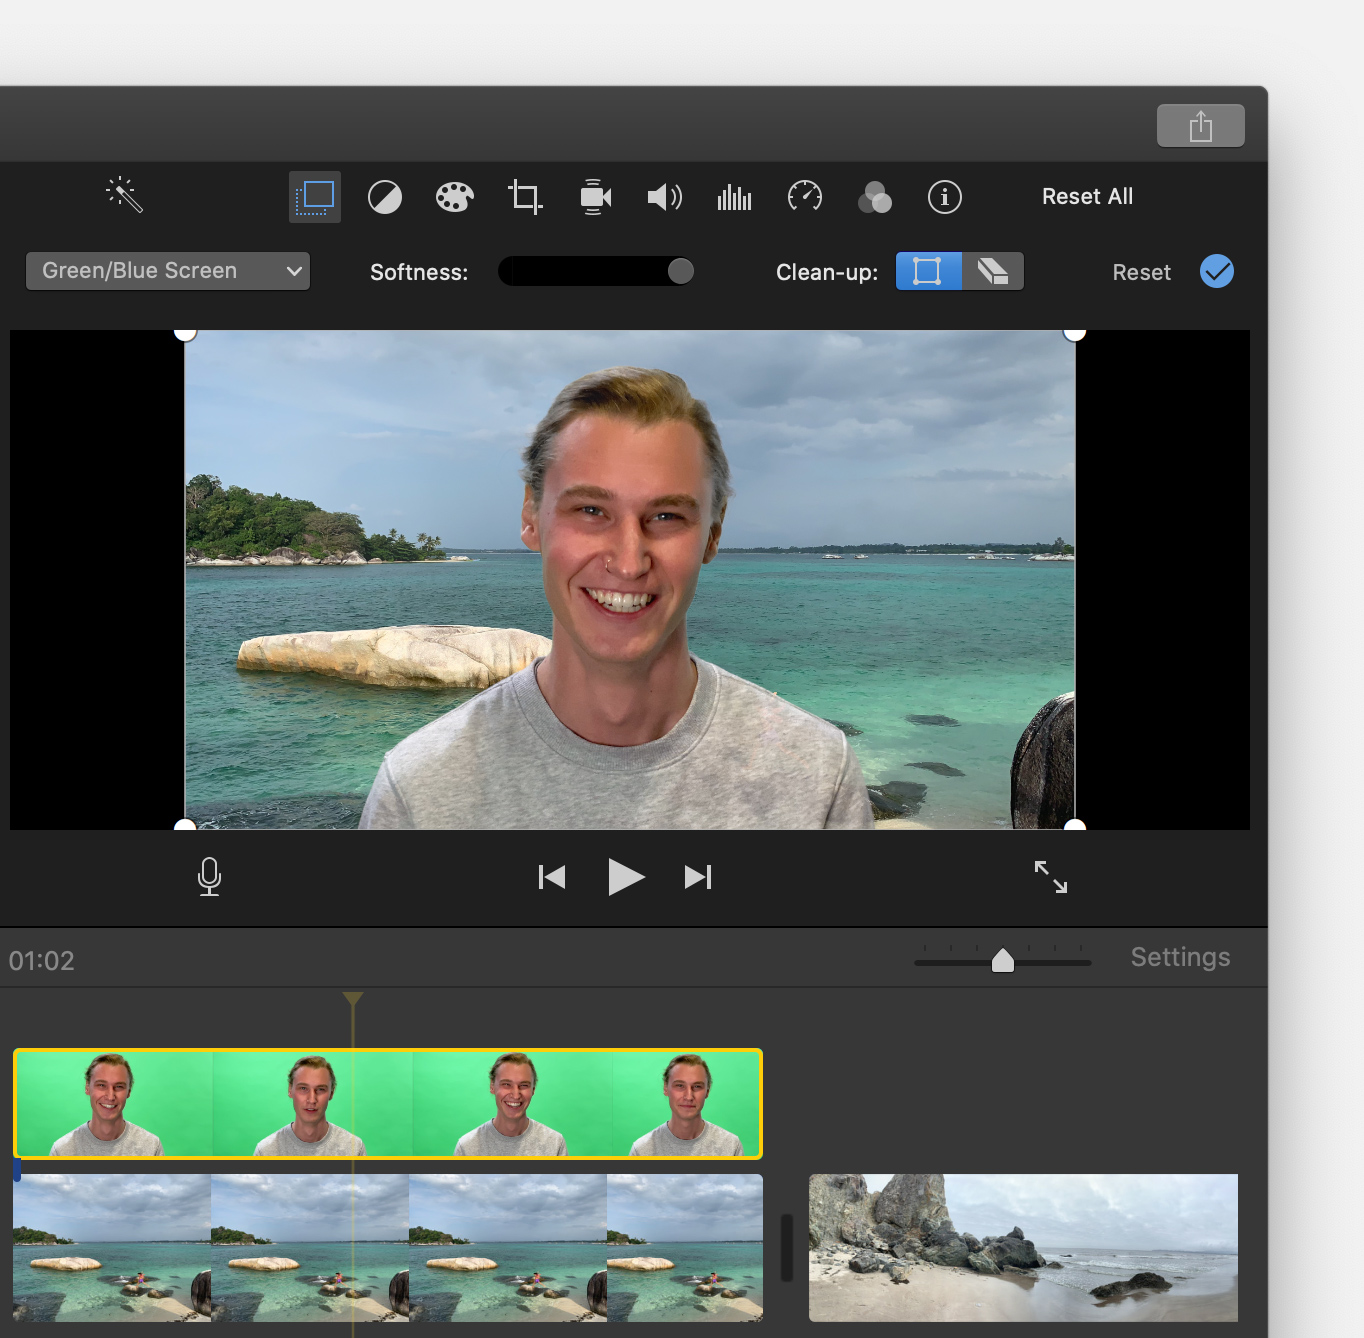
- To adjust the transition between the green-screen clip, drag the Softness control.
- To isolate areas of the green-screen clip, click the Crop button
 , then drag the corners of the frame in the viewer.
 - To mask parts of the green-screen clip, click the Clean-Up button
 , then drag across the clip in the viewer.
After you’ve added the green-screen affect, you can make adjustments. Select the green-screen clip in the timeline, click the Video Overlay Settings button ![]() , then use any of the green-screen controls to make adjustments.
, then use any of the green-screen controls to make adjustments.
- To adjust the transition between the green-screen clip, drag the Softness control.
- To isolate areas of the green-screen clip, click the Crop button , then drag the corners of the frame in the viewer.
- To mask parts of the green-screen clip, click the Clean-Up button , then drag across the clip in the viewer.
Filformater
Filformat ikke er det samme som videoformat. Filformat er det format som videooptagelsen bliver gemt i f.eks. i en .mov, .wmv eller .avi fil.Videoformat på den anden side er et udtryk for, hvilken komprimeringsmetode der er anvendt i videoen. Der indgår flere komponenter i et videoformat.beholder / container
komprimeringsmetode / compression
codec / codec
Hvad er en beholder/container?
Normalt består en beholder af en video-codec og en audio codec, men kan også indeholde f.eks. undertekster. En beholder tillader dig at vælge en codec (komprimeringsmetode) for din video og en codec for din lyd. På den måde kan du bestemme hvorvidt videofilen skal være i alle bedste kvalitet eller den skal komprimeres for at fylde mindre.Populære beholdere er AVI, Matroska (som benytter forlængelsen MKV), MP4 (som er blevet populariseret af Apple i iTunes Store, og dom også findes i en M4V forlængelse, men beholderen er nøjagtig den samme), MOV (som blev skabt af Apple), Wmv (Microsofts videoformat som komprimerer knap så effektivt som mpeg4)
Nogle er de mest effektive codecs til komprimering af video og lyd er:
H.264 - en er de mest populær codecs der også anvendes til webvideo og er en del af MPEG4-codecs
AAC (Advanced Audio Coding, ses også med filendelsen M4a) – Afløseren for MP3 og ny industristandard til lyd der kan lagre på samme plads som MP3, men i meget højere kvalitet.
Mest anvendte videoformater
MP4
MP4 er en forkortelse for MPEG -4, en populær MPEG-fil udvikles efter den tidligere MPEG-2, som er det format, der bruges i DVD og MPEG-1 , som er det format, der bruges i VCD . MPEG står for Moving Picture Experts Group.Den MP4 video filformat er meget udbredt i forskellige medieafspiller og multimedieudstyr, herunder iPods og MP4-afspillere. Det er også brugt i Blu-ray diske . En MP4-fil kan let importeres til en Camtasia projekt. På samme tid, kan det også bruges som eksport filformatet, når frigive en færdig Camtasia video.
MOV
Video kan eksporteres i et .mov format, populært omtalt som en MOV-fil. Dette format bruger en komprimeringsalgoritme fra Apple, men det kan faktisk være kompatibelt med både Mac og Windows-systemer. Denne videofil kan også afspilles i flere medieafspillere, samt at den er tilpasset til webvisning.AVI
AVI , en forkortelse for Audio Video Interleave. Et videoformat , der gemmer data , der nemt kan brugess i en bred vifte af codecs med mindre komprimering krav. Som en MMS-container format, er det Microsoft - introducerede videofil let kompatibel til input i et Camtasia projekt. Det er også en af de muligheder for en færdiggjort Camtasia projekt, der er klar til eksport til en video -fil. Den eksporterede fil kan nemt deles online, via e-mail eller endda brændes på en cd eller dvd .WMV
Sammenligningsskema over videoopløsninger
Videoopløsning (bredde og højde) | Navn | Kvalitet |
7.680 x 4.320 | 4320p | 8K Ultra HD eller Full Ultra High Definition (UHD) |
3840 x 2160 | 2160p | 4K eller Ultra High Definition (UHD) |
2560 x 1440 | 1440p | 2k QHD eller Quad HD |
1920 x 1080 | 1080p | High Definition Maximum (HD) |
1280 x 720 | 720p | High Definition Minimum (HD) |
854 x 480 | 480p | Standard definition (SD) |
640 x 360 | 360p | Normal definition |
426 x 240 | 240p | Lav definition |
256×144 | 144 s | Laveste definition |


Ingen kommentarer:
Send en kommentar